
Gail Doane’s Lacy Block Yoke Dress from the new Summer 2022 issue of Classic Sewing magazine is sure to be a favorite this season. As with all of Gail’s expertly-crafted designs, the details on this adorable summer dress are exquisite. The intricately joined laces, the mitered corners of the beading outlining the yoke’s shape, the bound neckline, and the precisely tucked hem combine beautifully on the centerpiece yoke. Buttons down the front makes dressing easy, and the pleated fullness makes this dress comfortable to wear during the warm days of summer. Gail credits her PFAFF® creative icon™ 2 for helping her create this masterpiece.
“My PFAFF® machines have been a constant companion over the past 45 years. They have produced hundreds of garments for seven children and 12 (and counting) grandchildren. They have facilitated the great pleasure of making heirlooms for some of life’s sweetest moments…weddings, births, graduations. My PFAFF® creative icon™ 2 provides fine, precision sewing with every project. In short…I love my PFAFF®.” — Gail Doane
 Get the complete pattern and instructions for the Lacy Block Yoke Dress in the Summer 2022 issue, and enjoy Gail’s expert guide to creating beautiful, bulk-free bias neckbands in both the magazine and below.
Creating Beautiful Bias Neckbands—Eliminating Bulk
NOTE: These directions are written for a seam allowance of 3⁄8″. If your seam allowance is different, adjust as necessary.
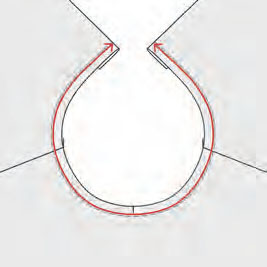
1. With the front or back button bands folded into finished position, staystitch (2.5L) the neckline a scant 3⁄8″ from the raw edge (fig. 1).

2. Measure the EXACT distance around the neckline at the 3⁄8″ staystitch line (fig. 2).
3. Cut a 2″ wide bias strip the length of the finished neckline plus a couple of extra inches. The short ends of the bias strip must be cut on the straight grain. If the bias strip is not long enough, stitch two pieces together (fig. 3) and press the seam open. When the strip is attached to the garment, the join should fall at the center back, if opening in the front or on the side, the join should fall in the back.

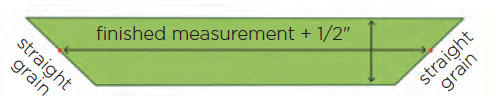
4. Starting at one end of the bias strip, measure down the MIDDLE of the strip and mark the EXACT measurement from Step 2, PLUS 1/2″.
5. Cut along the straight grain, through the marked dot, in the shape shown in the diagram (fig. 4).
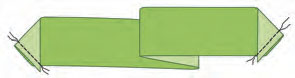
6. Fold each short end over itself, right sides together, extending the point 1/4″ beyond the bias edge. Stitch a 1/4″ seam along the short straight grain edge, using a 1.5L stitch. Do not try to backstitch. Repeat for the other end of the bias strip (fig. 5).
7. Clip the corners and trim the seam allowance down to 1⁄8″.
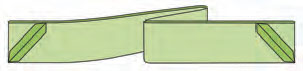
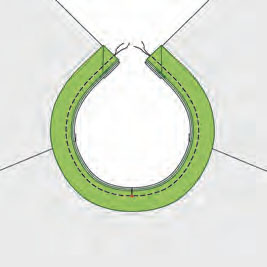
8. Fold the bias to finished position, right sides together, and press the 1⁄8″ seam allowances open (fig. 6). Turn the bias right side out, with the wrong sides together and raw edges even and press. Be careful not to stretch the bias while pressing.
9. Mark the center point of the neckline and the center point of the finished bias neckband. Right sides together, pin the bias strip to the neckline. Match the center points and the two finished edges to the edges of the front (or back) opening first, then pin the remainder between the existing pins.
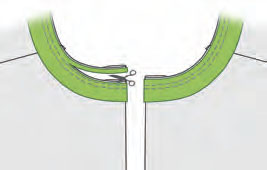
10. Stitch the bias to the neckline using a 2.0L stitch (fig. 7). The stitching line should be right on the 3⁄8″ seam line.
11. Stitch a second time in the seam allowance 3⁄16″ (or halfway in the seam allowance) away.
12. Trim through all layers very close to the second stitching line (fig. 8).
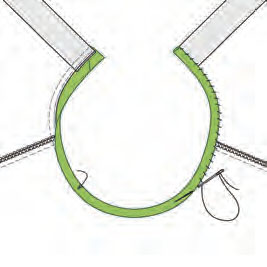
13. Wrap the bias around the seam allowance and hand sew in place on the wrong side (fig. 9).
Adding Swiss Edging
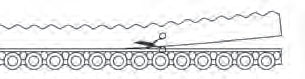
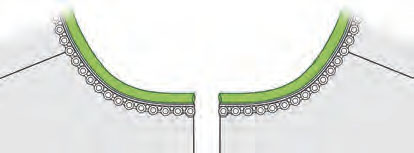
1. Cut a piece of 1/4″ Swiss edging long enough to go around the entire neckline plus 1″. Trim the seam allowance completely away (fig. 10). Press under one pattern repeat at one end.
2. Right sides up, position the folded back end of the edging against the finished folded edge of the dress front. Align the cord line of the edging to the ‘ditch’ between the neckline bias and the body of the dress.
3. Using two strands of 50wt. thread, hand sew the edging to the neckline (fig. 11). Follow the pattern repeat on the edging to weave the needle in and out of the pairs of entredeux holes.
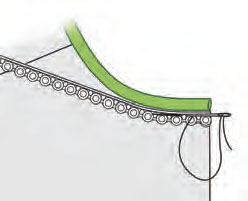
4. At the opposite end, trim off any excess edging, fold under one pattern repeat, and securely hand sew in place (fig. 12).
Gail Doane stays busy sewing for her loved ones and spending countless hours thinking up new ideas and making them come to life. The meticulous detail she applies to every aspect of the garments she sews is the most distinguishing facet of her creations. Check Gail’s teaching schedule and online class schedule at www.gaildoane.com. Visit www.etsy.com/shop/gaildoane for kits and other supplies.
About the PFAFF® creative icon™ 2 sewing and embroidery machine
Experience World-First Innovations
Artificial Intelligence Technology—Continuously process information to learn and improve machine performance
The World’s First Consumer Machine with Voice Control—for hands-free function, inspiration and assistance
Projector—highlights sewing path with adjustable guides and grids and allows you to preview embroideries or stitches on fabric
mySewnet™ Connectivity—the world’s first subscription for embroidery editing and design
creative™ Embellishment Attachment—360°, an engineering innovation that will automatically couch yarn, ribbon, beads or cord in all directions directly on your embroidery project
Camera—allows you to scan a hooped project and upload that as a background to your screen in embroidery mode
Largest Machine Embroidery Hoop on the Market—(360 x 350 mm)
And much more! Learn more about these and other top-of-the-line features here.
![]()


