
March is National Craft Month! To celebrate, we’ll be featuring a few of our favorite projects from past issues of Classic Sewing magazine right here on our blog. The projects we’ve selected to feature include both garments and home decor projects, and range from embroidery projects to items you’ll make with your sewing machine and serger. All the projects are perfect for springtime sewing. We’ll also spotlight some of our products, clubs, and online classes offered on our sister site, The Sewing Collection. We hope you enjoy!
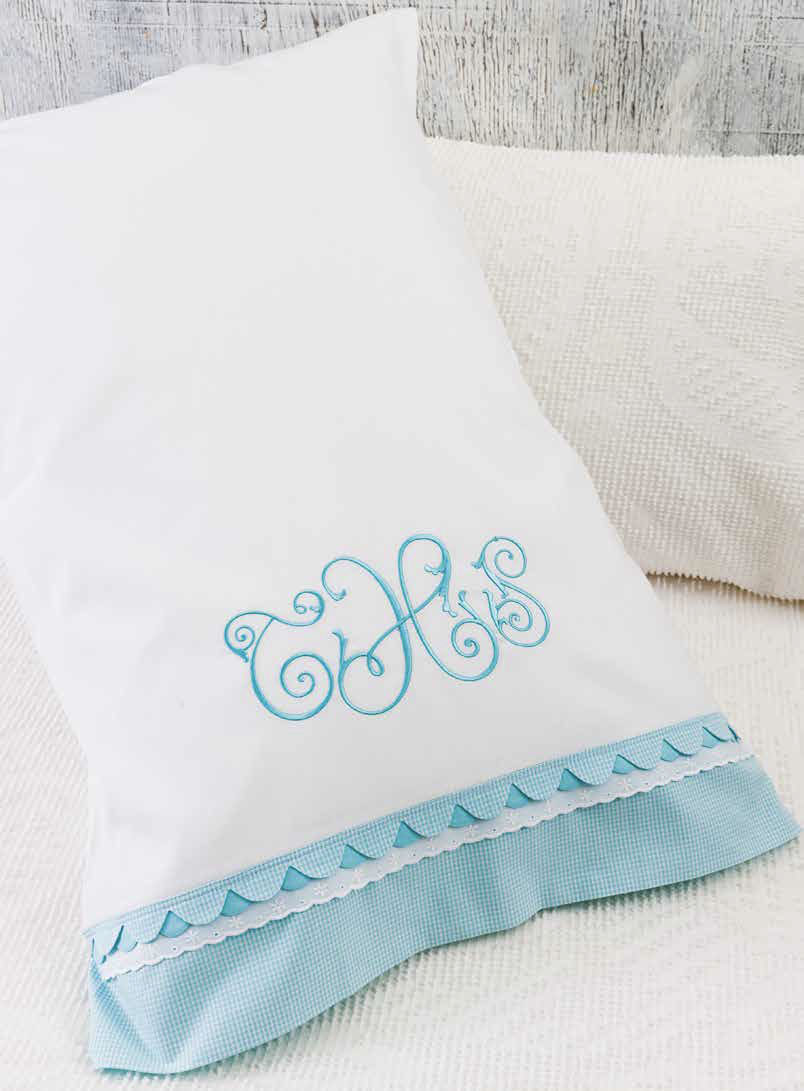
DOUBLE-SCALLOPED PILLOWCASE PROJECT TUTORIAL
By Connie Palmer, originally featured in our Spring 2017 issue
Decorate a pre-made or from-scratch pillowcase using Connie Palmer’s quick and easy instructions for creating this adorable double-scalloped embellishment. Add a bit of embroidered edging and an embroidered monogram from the Classic Sewing 2017 Monograms and presto-change-o—you have a wonderful personalized pillowcase!
SUPPLIES
- Pre-made pillowcase
- 5/8 yard of 2″ wide embroidered edging
- 1/4 yard of gingham for hem (optional)
- Two fabric rectangles 4″ wide x 22″ for the scalloped trim
- JP Quick Points 1″ scalloped ruler
- JP Quick Points 1″ scallop pusher
- Tacky water-soluble stabilizer
- Embroidery thread for monogram
- Embroidery hoop appropriate for chosen monogram
Designer Tip: If you do not have a hoop large enough for the design, it can be embroidered in multiple hoopings or you could use just one letter. — Connie
The directions given are for a premade pillowcase. If a gingham hem is desired, remove and replace the pillowcase hem with a gingham fabric hem or cover the existing hem with a layer of gingham fabric. The double scallops and the embroidered edging embellish the pillowcase front only.
EMBROIDERING THE MONOGRAM
The embroidery is from the 2017 Classic Sewing monogram set. It is available in 3″, 4″ and 5″ letters and is a gift to the 2017 Classic Sewing magazine subscriber or is available for purchase from the Classic Sewing magazine boutique.
 1. Determine which side of the pillowcase will be the side that will show. This is the side that you will embellish.
2. Fold the pillowcase in half lengthwise and crease to mark the center. Measure up the center 4-1/2″ from the hem band seam and mark. This is the embroidery center.
3. In software or at the machine, pull up the center letter in the 4″ height. Pull up the side letters in the 3″ height and arrange as desired.
4. Hoop tacky water-soluble stabilizer paper side up. Score the paper and remove from the inside of the hoop, exposing the tacky surface.
5. Place the marked side of the pillowcase on top of the stabilizer, aligning the center marks on the pillowcase with the registration marks on the hoop.
6. Ensure that the remaining parts of the pillowcase are not caught under the hoop and embroider according to the machine manufacturer’s instructions.
7. Cut excess stabilizer from outside the embroidered monogram and soak to remove the remaining stabilizer. Let dry and press well.
CREATING THE DOUBLE-SCALLOPED TRIM
1. Place the ruler on the wrong side of one 4″ x 22″ fabric strip. This fabric will be the back layer of scallops. Mark around the outside and all holes and slots (photos 1 and 2).
2. Place remaining 4″ x 22″ fabric strip to the marked strip, right sides together. This fabric will be the front layer of scallops. Sew 1/4″ inside the drawn lines, pivoting at the dots (photo 3).
3. Trim, leaving a 1/8” seam allowance and clip all points and curves (photo 4).
 4. Following the drawn dashed line, cut down the center of the strip through the marked layer only (photo 5).
5. Turn the strip right side out and press well. Use the scallop pusher to ensure that the sewn edges of each scallop are fully turned (photo 6).
6. Fold created piece in half with the raw edges to the inside (photo 7).
EMBELLISHING THE PILLOWCASE
1. Measure the side of the pillowcase to be embellished. Cut the embroidered edging and the created double-scalloped trim to this measurement plus 1/2″.
2. Fold the long raw edge of the embroidered edging to the wrong side 1/2″ and press (photo 8). Fold the sides of the embroidered edging 1/4″ to the wrong side and press.
 3. Place the wrong side of the embroidered edging to the right side of the pillowcase, aligning the top fold of the edging with the seam of the hem band and the side folds with the side seams of the pillowcase.
4. Pin and stitch the top folded edge of the embroidered edging to the pillowcase.
5. Unfold the double-scalloped trim and fold each side to the wrong side 1/4″. Refold and press well.
6. Place the double-scalloped trim on top of the embroidered edging, aligning the top folds. Pin and stitch through all layers next to the fold. Stitch again approximately 1/8” away from the first stitching.
7. Stitch down both sides close to the folds, through all layers.
 ABOUT THE DESIGNER
What began as a simple interest in sewing 35 years ago has blossomed into an exciting adventure that Connie Palmer loves to share with her students. She travels and teaches for Martha Pullen Licensings, School of Art Fashion, Original Sewing & Quilt Expo, and Sewing at the Beach.
 ENJOYED THIS PROJECT? WE THINK YOU’LL ALSO LOVE:
Classic Sewing magazine: Published four times a year, each issue features beautiful patterns for making children’s garments, casual pieces, gifts, and projects galore — all created by the industry’s best designers and leading sewing celebrities.
The Sewing Collection Online Shop: If you’re looking for the best sewing notions, supplies, and digital patterns, look no further than our Sewing Collection Online Shop! Our curated collection of sewing notions includes the tried-and-true tools that our staff uses over and over again in our own sewing rooms. Plus, you can shop machine embroidery collections, ready-to-embroider baby items, e-patterns, and more.
The Embroidery Club: This is the premier online club for sewists who love machine embroidery! Members receive access to multiple design collections, including alphabets, seasonal designs, children’s motifs, and more.
 The Doll Club: Featuring exclusive patterns designed by Connie Palmer, this online club offers members downloadable patterns for creating an adorable wardrobe of clothes and accessories designed to fit popular 18″ dolls.
Online Classes: We offer 100+ online sewing classes and workshops! In addition to a wide catalog of start-anytime courses, experience the fun and business opportunity of a Martha Pullen Online Licensing. Each licensing curriculum includes 30+ projects, taught by Licensing Staff along with other sewing educators.
Original Sewing & Quilt Expo: Join us live and in-person at any of our Original Sewing & Quilt Expo events held across the country. These fun and inspiring events include three days of classes, shopping, presentations, and galleries! The Expo also offers a great selection of live online sewing and quilting classes via Zoom throughout the year.
Our YouTube Channel: Visit our new YouTube channel for endless hours of sewing inspiration. You can view classic episodes of the long-running PBS show, “Martha’s Sewing Room.” More video content will be added in the future, so subscribe and stay tuned!
Plus, sign up for our newsletter to get weekly inspiration delivered right to your inbox!


